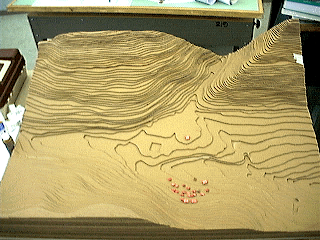
As an architecture student, you realize how busy life can be at times; working, going to class, doing homework, eating, and hopefully getting sleep. In architecture design studios at SIUC, you are told to design a structure and construct a site model. The first few weeks in the project you conduct precedent studies that lead to the designing phase. In this phase you get to create a structure in which you believe most represents your objective. Once you finish designing you still have to put together the site model. Building a site model can be really useful to help represent your structure in 3D and how it fits within the site. Site models often include the building(s), landscaping, sidewalks, roads, people, and contours. All of these elements show how the surrounding context connects. One element that is often confusing is the concept of contour lines. Contours are used to show a grade change on the model. So how can you avoid a contour catastrophe while making your site model?

Follow these few simple steps:
Step 1- Take the site into CAD and plot it to scale with the contour lines.
Step 2- Once plotted, you place the plot with the ink side down and take a charcoal pencil and shade every line on the back of the sheet.
Step 3- Flip over the plot and trace the lowest elevation contour line(s). Step-4 Take another piece of your material and put the plot on top of it and trace the next highest contour line(s).
Step 5- Repeat Step 4 until you are done tracing the contour lines and label each contour with the elevation height.
Step 6- Take all sheets and cut on the line(s) but keep all pieces together that are on one sheet.
Step 7- Now take the first sheet (lowest contour) that you cut/traced and remove the smallest piece and trash it (only if your building is on a hill). Often times there are hills and valleys on a project, so you will start to make a model with several pieces on the base and eventually work your way up the hills; not all of the hills will be as high as the others.
Step 8- Now take the proceeding sheets 2, 3, 4… and keep the biggest piece, placing it on the largest previous piece. Example: biggest piece from sheet 2 goes on the biggest piece from sheet 1.
Step 9- Once to the top of the site, go back and glue between each layer of material; be careful to not mess up the layers.
Step 10- Place all buildings, cut out sidewalks, trees, people, and other stuff on your contours.
Step 11- Turn in your model.
Image: http://www.okstate.edu/osu_orgs/asla/Peru98/Model.html


No comments:
Post a Comment